intro

A random series of articles on war gaming in 40K, FOW and other systems. The headings are, WiP; Conversions and models in various states of assembly. PiP; Paint works on various models. Mission Critical; scenarios or missions to bring a bit of a twist to a normal game. MiA; rules for units and characters that could/should/might appear in a game. Dig In; How to guides on making various types of terrain for different game systems. Sit Rep; Battle reports and after action reports on games played

Thursday, July 22, 2010

Mission Critical (40K); Black Hawk Down

Overview;
Third Armageddon war.
Imperial fighter ace call sign Black Hawk has been shot down over Sulpha river. High command fears that the news will devastate morale. But hope is not lost. Black Hawk survived the crash and has been captured an Orc hunter-killer-eater patrol. A Imperial gaurd patrol is in the area and has been order to rescue the pilot before patrol lives up to the later part of its name.

The forces;
Black Hawk Down is a kill team mission as outlines in the battle mission book. The Orc force is outlined in "the Orc Patrol" special rule. The Imperial gaurd patrol consists of 200 points of guard.
Both sides have access to USR's and must secretly write down who has what.


Deployment;
Terrain is as per map. The main features are the stake at the centre of the table (to which Black Hawk is tied to) and the six Orc huts surrounding it, containing the Orc patrol.


Reserves & Who Goes First;
The Orc reserves and their deployment is covered under "the Orc Patrol" and "the Village" special rules. The Guard have no reserve.
The game starts with the Guard moving on from their chosen table edge.


Special Rules;
1) Sentries and sounding the alarm,
The Orc patrol that captured Black Hawk is resting up in a village getting ready for a hummieque later in the day. The village is protected against attack ten grot sentries patrol the perimeter.

Moving Sentries
At the start of each Orc turn player both roll a D6 for each sentry. Whoever rolls highest may move the sentry the distance indicated on the dice. In the event of a draw the Orc player may move the sentry.


Raising the alarm
A sentry will raise the alarm if any of the below condition are met,
-If a sentry ends a turn within initiative range of a scout model ie 2"
-If a sentry is fired upon by any weapon except a silenced one eg sniper rifle. The sentry will raise the alarm if he survives being hit by a silenced weapon.
- If a sentry is attacked in close combat he will raise the alarm on a 4+.
-if a Sentry ends a turn within initiative range of a dead sentry he will raise the alarm.

Once the alarm has been raised the Orc patrol can start to activate. Roll a D6 on a 5+ a single randomly generated Orc element can enter play. Add a D6 on each subsequent turn and for each 5+ rolled an Orc element can activate. How the patrol activates and comes into play are outlined in "the Orc patrol" and "the village" special rules.

2) The Orc Patrol
The Orc patrol is broken into six elements for purpose of reserves. Roll a D6 and consult the table below to see what element has been activated. Once an element has been activated it cannot be activated again reroll the D6 to determine a replacement element.


1 2 Runtherders (one with Grot prod and the other with Grabba stick) and 3D6x2 grots
2 2D6 Orcs with either shootas or sluggas, the tenth orc may have a big shootas
3 3D6 Orcs with either shootas or sluggas, the tenth orc may have a rokkit
4 2D6 Orcs with either shootas or sluggas, the tenth orc may have a big shootas. Plus a Nob with 'eavy armour and custom weapon (counts as a big shoota and a power klaw)
5 D3+1 Nobz 'eavy armour, The frist nob has a choppa, the second a 'uge choppa, the third a power klaw and the fourth another choppa.
6 1 Killa Kan with Kustom Mega blast, grot riggers and extra armour.

3)The Village
The village consist of six Orc huts numbered one to six. Once an Orc element is generated roll a D6 to determine which hut they are in. The element leaves the hut in the same fashion as a unit disembarking from a stationary transporter. Once a hut has been used it is empty and further elements must come from another hut.
Victory Conditions & Game Length;

4)Black Hawk.
Unsurprisingly, for a man who has been shot down and beaten up, Black Hawk is in bad shape. Black Hawk cannot move until a Guard model is in base contact and pass a strength test to free him from the stake. After which Black Hawk can only move if he stays in base to base contact with a Guard or Orc model, effectively the model is carrying Black Hawk. Any model in base to base contact with Black Hawk counts as slow and purposeful (USR).


Victory conditions.
The Guard win if they get Black Hawk off the table another result is an Orc win.

40K (PiP); Bases and Faces


Bases and Faces

"Bases and faces" I am told is the mantra of the GW painting studio. I am guessing that the logical is that the base represents the Marco level painting while the face represent the micro level painting. Or to put it another way the painting of the base is the first impression of the model. It is the bit that sticks out as you walk by the table or look at the army from a distance and it attracts the viewer to examine the army in more detail. The faces bit is the next step as the viewer takes a closer look at the model the smaller details begin to shows.

Personally I'm not up for the painting faces aspect yet, painting eyes, nostril hair seems like more pain than gain. But the bases aspect I'm willing to try. Hence this blog post

Originally I was looking for inspiration for a Grey Knight army I have sitting in the "to do" pile. A new army means trying out new modelling/painting/gaming methods. For a theme I wanted the Grey knights to be fighting on a daemon world of some type. The way to reinforce the daemon world image was to tart up the bases of the Grey Knights. A browse on the internet highlighted several manufactures of custom made Daemon world bases the one I liked the most was Dark Art Miniatures lava world. Which was similar to a display table I had built for Gamers World a while ago. The potential of lava bases models fighting on a lava table seemed to fit.

Since this was just a test run rather than the start of the army properly, the test models were Chaos Daemons rather than Grey Knights I really just wanted to see how the bases worked out.

The method -bases

The bases were undercoated GW chaos black then repainted chaos black to cover any gaps.

Once dried the bases were dry brush V German grey.

The lava parts of the bases were painted GW blazing orange.

Once dried the lava parts were wet washed V flat yellow.

Once everything was dry the whole base was lightly dry brushed V german grey.


The method - Blood Letters

The models were made as normal and undercoated AP. blood red.

The models were then painted GW blood red.

The blades were painted GW chaos black, the hilts were painted GW bronze, the handles were painted GW bleached bone and the tips were highlighted GW blazing orange.

The tongues were painted GW blood gore.

The whole model was given a coat of AP medium tone but no varnish was applied.


GW –Games workshop

V=Vallejo

AP =army painter


Friday, July 16, 2010

Sit Rep (40k); Conclave 2010

Round one Vs Colin Culliane's Space wolves
mission capture the flag deployment pitch battle
Colin's space wolves consisted of
Wolf lord
2 Rune priest
1 Wolf guard Terminator squad ( in a pod)
3 packs of Grey Hunters (with all the trimmings in pods)
1 Dreadnought (in a pod)
14 blood claws

Dublin has Space Wolf Ger, Cork has Space Wolf Colin (rumours that they both walk around their respective houses wearing nothing but a mullet wig and a wolf skin thong can not be confirmed). Colin was a a slightly disadvantage for the game in that he was still re-doing his wolves meaning some of his first choice units were not ready.

The Sister won the dice off and placed their flag in the centre of their deployment zone. The Wolves reciprocated by placing their flag on their left flank behind a low wall. The Sisters deployed their force in two lines on their right flank, threatening the wolves flag while covering their own. The first line consisted of the Cannoness and Celestians flank on either side by a Sister squads, all were mounted on transports. The second line consisted of the three Exorcists The Wolves deployed a Rune Priest and Bloodclaws opposite the Sisters flag. A "word in your ear" moved them six inches back towards their edge.

The Sisters started the attack, the Cannoness's strike force moved flat out towards the Wolves flag. The exorcists fired on the Bloodclaws who obligingly fled of the table. In reply the Wolf Lord, his terminators and two packs of Grey Hunters, one with a rune priest, podded into action. One Grey Hunter pack with the Rune Priest podded between the Exorcist squadron and the Sisters flag. The Wolf Lord and his retinue podded between the Cannoness and the wolves' flag. The second Grey Hunter pack podded between the Cannoness and the Exorcist squadron. The opening shots from the Wolves disarmed one Exorcist, immobilised another and destroyed a Rhino, killing several Sisters in the process.

Sister reinforcements started to arrived in the form on a Sister's squad and the Callidus. The newly arrived Sisters de-bussed close to the Grey Hunter pack nearest the Sister's flag. The Callidus deployed covering the two Grey Hunter packs. The Cannoness and her Celestians dismounted moved to support the Sister squad who had lost their Rhino as them moved against the Wolves threatening the Exorcist squadron. The third Sisters squad supported by an Immolator and a weaponless Exorcist pushed on towards the Wolves flag. Shooting saw Grey Hunters nearest the Sister's objective take heavy casualties before killed off by the Callidus in close combat forcing the Rune Priest to flee. The second Grey Hunter squad also took heavy casualties and also flee. The Space Wolf second wave consisted of a Dreadnought which podded close to the Exorcist squadron. While the Wolf Lord split from his retinue with both units moving to block the advancing Sisters squads. Shooting had no effect but the Terminators destroyed the Immolator in close combat while the Wolf Lord stunned the sister's rhino.

Sisters Garrsion their own objective

The Sisters third wave arrived and consisted of a celestian squad in an immolator which rolled on in close range of the dreadnought and promptly destroyed it. Elsewhere the sister unit remounted their rhino and moved to secure their own flag. The sisters in the stunned rhino de-bussed and moved on towards wolves flag. Other units moved to cover the fleeing Space Wolves. The exorcist targeted and destroyed the Wolf Lord while the cannoness and her celestian fired on the terminators killing two. The cannoness assaulted the terminators and pinned them in combat. The Space Wolf third wave consisted of the last grey hunter pack which podded between the Sisters and the Wolves flag. The Sister unit caught out in the open advancing on the wolves flag was destroyed but elsewhere the cannoness saw of the terminators forcing the sole survivor to break and flee. She then consolidated towards the newly arrived grey hunters.

Sisters storm the Space Wolf objective

With most of the Wolf units in retreat the sisters moved to destroy the drop pods and escort the fleeing units of the table. The cannoness moved towards the last active Wolf unit which fled after being hit by a volley from exorcist squadron. In reply the first of the space wolf units reached their table edge and left the table. The sole surviving wolfguard rallied but was on his own and on that the game ended.

The last Wolf Gaurd standing

result win sisters 20-0

Round two Vs Buckhardt's Eldar
mission annihilation deployment dawn of battle.
Buckhardt's Eldar consisted of
Eldrad
Avatar
Wraithlord
10 Dire Avengers in a wave serpent
10 Guardians a wave serpent
5 Fire Dragons in a Falcon
1 squadron of two warwalkers
10 Harlequins
1 bike squadron of three bikes

Buckhardt is sparing partners with some of the players on the German ETC team so it was interesting to play against German 40K player. Judging by his expletives in German when he saw his Eldar were matched against the Sisters indicated he knew how to play. The game started badly with the Eldar picking their table edge and claiming the area I did not want them to get. To make it worse they opted to roll on turn one thereby avoiding Callidus's "word in your ear". In response the Sisters opted to roll on turn one.

Eldar build a nest in their deployment zone.

Turn one saw the Eldar arrive and built a nest in their table half. The Sisters rolled on in castle formation with the transports opting to blow smoke. Turn two saw the Eldar close combat units work forward towards Sisters. Shooting was poor with only a rhino being immobilised. In response the Sisters started to work around the eldar flanks trying to enfilade their position. Shooting was equally poor with with one war walker destroyed and the other immobilised.

The Eldar started to break from cover to attack the sister in earnest with the big guys leading the charge. Shooting was terrible little to no damage being inflicted. The Eldar got some consolidation in destroying the cannoness's immolator in close combat. Pinning the Canoness and her celestians.

With the Canoness pinned the remaining sister started to counter attack. The exorcist fired on and badly wound the Avatar while a Sister squad flamed the harlequins killing all but one. The second celestian squad de-bussed and downed a Falcon. The remaining Sister's units work forward into better firing positions.

Taking heavy casualties the Eldar pushed forward. Their assault was reinforced by the arrival of a jet bike squadron. The Wraith lord flamed, assaulted and then destroyed the sisters unit that had attack the harlequins. The Avatar fired on a exorcist, missing it , then failing to hit it in combat. The Dire Avengers de-bussed and blade stormed the pinned canoness and celestians destroying the unit and wounding the canoness. Eldrad also de-bussed and stunned an exorcist in combat. The sister counter was led by the appearance of the Callidus who Neural Shredded the fire dragons and jet bikes The Dragons broke and ran while the bike were finished of in combat. The Stunned exorcist tank shocked the surviving Harlequin and the Dire Avengers and was reward with the Dire Avengers failing a morale test. The Cannoness shot the last harlequins while the exorcists destroyed the Avatar.

As the Sisters close the Avatar and Wraith Lord break from cover

With most of the eldar army either dead or fleeing, Buckhardt continued to push the attack. The surviving war walker obliterated the callidus who had gone to ground. The wraith lord destroyed an exorcist. While the rest of the army went to ground. To counter a sister squad got within range of the sulking guardians and flamers wiped out the squad bar the warlock who passed his morale test. The remaining exorcists reduced the Wraith lord to his last wound. On that the game ended.

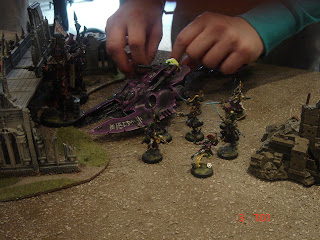
The Wriath Lord set his sights on the Sister's squad that flamed the Harlequins
Result win Sisters 19-1


Round three Va Dan Aherne's Chaos Space Marines
Mission multiple (three) objectives deployment Spearhead

Dan's CSM consisted of
Daemon Prince
3 squads of three terminators (two with 3 combi-meltas and one with 3 combi-plasma)
3 squads of three obliterators
2 possessed Landraiders
2 squads of 5 chaos marines

Dan won the dice and picked the corner with two objective with the third objective near the centre of the battlefield. On a good day Dan is arguable one of the best players in Cork, today was not that day. The CSM deployed in cover but in position to move into good firing positions. In reply the Sisters all went into reserve.

Turns one and two saw the CSM making their biggest error with one squad of CSM mounting a landraider and move towards the Sisters table edge with an escort of obliterators. Two terminators squads with meltas also arrived but with no targets opted to deepstrike on the CSM table edge. The first wave of sisters consisted of the cannoness, one celestian squad, one squad of sisters, the Callidus and an exorcist. The celestian and their immolator quickly slagged the land raiders killing several of the valuable scoring marines. The Exorcist destroyed the escorting obliterators. The Sisters unit moved into coverd. The Callidus destroyed a terminators squad.

CSm landraider make a fatal error moving into close range of meltas

The CSM tried to extract the CSM squad trapped on the Sister table edge with the Daemon Prince and the obliterators moving to support them. The obliterators killed several on the celestians and destroyed the Immolator. The Terminators destroyed the Callidus. The Second wave of sisters arrived consisted on another Sisters unit and an Exorcists. The Sisters unit moved into cover while the exorcist killed a couple of obliterators. The Celestian finished of the CSM squad while the cannoness wounded the Daemon Prince.

The third squad of terminators arrived and plasma fired destroyed the second exorcist while the obilierators stunned another. The Daemon Prince assaulted the Cannoness who through and act of faith survived the combat. The Sisters third wave arrived consisted of another exorcist, the third Celestian squad and the third Sister squad. The Celestian moved forward to close the range to the second CSM landraider. All three Sisters squad broke cover and blew smoke. The third exorcist destroyed the plasma terminators. The Cannoness continued to duel with the Daemon Prince.

The remaining oblierators fired on the Sisters Rhinos trying and failing to immobilise or destroy the vechicles. The Daemon Prince killed the cannoness after sister failed an act of faith. In response the exorcists wounded the Daemon princes while the Sisters de-bussed on two of the objectives, flamer and bolter fire cleansed one of the objective on the last CSM terminator squad. The game ended with the Sisters holding two objectives with the last one unclaimed by either side.

Sisters re-claim a ruined chapel from the CSM

Result win Sisters 17-3


Overall the Sister claimed 56 of the 60 points available. Sylan playing Nurgle CSM on table two also sneaked in a score a of 56. So the winner went down to opponent performance. My opponents between them scored five wins while Sylan's only scored four result overall win to the Sisters. Their third win this year.

Sylan's Nurgle CSM in vaghino's came second

Whose Angels?

More pictures of the day can be seen here

Wednesday, July 7, 2010

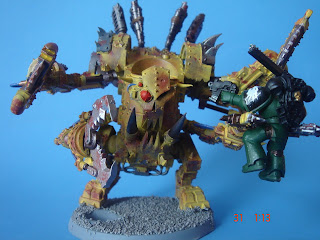
PIP (40K); the Crushinator


The Method;
the model built in sections body/legs and arms/weapons.
The parts were undercoated AP* bestial brown and then given a fine spray of AP metal
V flat yellow was wet washed on to most parts of the sections with some plates left clean.
V grey german was wet washed on to missed parts of the section ( to break up the yellow and give the dread scavenged look)
The wiring was painted GW ultramarine blue.
The tubing was painted GW fortress grey
The tubing and connections were painted GW brass.
The weapon blades were dry brushed GW mithril silver
The engine parts/horns were painted GW tin bitz followed by a dry brush of V gun metal
The sections were then stippled V cavalry red.
Once painted the model was stuck together and gaps were painted GW tin bitz.

The salamander marine was painted CA* dark elf green
His backpack/weapons/shoulder pads were painted GW black.
The transfers are from the space marine transfer sheet.


*AP =army painter
*V =vallejo
*CA = coat de arms

Thursday, July 1, 2010

Mission Critical (40K); Francks' world campaign part 2

The Franck's world campaign

Design note ; This sucker is big. The campaign below was originally intended as a two player campaign with both sides using all the armies. It is not for the faint hearted, it will take a bit of effort, but hopefully what you out in you get out. An umpire is desired but not essential. The mechanics are based on Forgeworld AI series adapted for 40K

intro story;
"colonel, its 0400, you are need in the comms room, there may be a problem" Colonel Steiner greeted the morning with a blunt curse. Grabbing his holstered plasma pistol he made his way to the comms room. Inside, lieutenant Horst was unsuccessful trying to calm down an excited voice on the vox "Sir, its trooper Deits, station at outpost West three" reported Horst "They are all dead, sir, the whole fraggin outpost, Captain Zorn missing, I can here gunfire and screaming from the southern dome. I think.....". Deit's report ended in a scream and the signal cut out. Horst cursed as the signal cut out, twisting several dial failed to return the terrified trooper. "lieutenant, log the time we lost contact with outpost west three,” said Steiner checking the charge on his plasma pistol, and call out the guard it looks like we have unexpected guests".


Overview;
Francks world in a non descript planet on the eastern fringe of the Imperial. Its principal contribution to the Imperialum is in the form of mineral wealth which is strip mined from the planet by the adeptus administirums work force. To mine the planet a human workforce is required. To protect the workforce from Xenos and other space raiders the imperial guard maintains a presence on the planet. For this campaign space raiders have arrived and it is going to get nasty.

Phase 1; Getting Started
The Franck's world is a two player attrition based campaign. At the start of the campaign each player has to draft an army to an agreed points value. In this case both players (Imperial Guard and Dark Eldar) wanted to use their entire armies so the agreed points value was 20,000 points. The army lists ignores the usual restriction and can include as many troops, HQs etc as players have models for, In addition forces from more than one codex can be used so long they would normally be allowed for allies. Forgeworld and Superheavies are also allowed as well as any mutually agreed unique units.


Phase 1: strategic targets
Franck's world consists of a series of strategic targets representing civilians, infrastructure and other valuable targets. The strategic targets are listed below.
Strategic targets on Francks world

Name; Size VPs
Colonial Control Large 50
The Starport Large 25
Primary Hab Dome Large 25
Secondary Hab Dome Large 25
Storage Facility (x5) Medium 10
Mining Operation (x10) Small 5
Dark Eldar Base Large 100

At the start campaign the Imperial Guard have 225 VPs while the Dark Eldar start with 100 VPs.

Phase 2; Assigning Defenses
The Imperial Guard forces are stationed at colonial control, the hab domes or other facilities to protect the citizens. Before the start of each turn the Imperial player can deploy some of his units to other strategic targets to protect them the Dark Eldar. If a strategic target with is a garrison is attacked the garrison will assist the relief force to fight of the raiders. The size of the garrison depends on the size of the target. Multiple the VPs value of a target by 100 to determine how many points it can hold.


Phase 3; Determining whose on the Offensive
The game starts with the Dark Eldar on the offensive. The offensive player determines how many games will be played during the turn from a minimum of one to a maximum of three. If the dark Eldar are on the offensive then they can select to attack a strategic target such as the Star port or Hab Dome. If the Imperials are on the offensive then they send out patrols and interdiction forces to hunt down the raiders.
At the end of the turn whoever won the most games lost turn counts as being on the offensive. If neither side won the majority of games last turn then there is a lull in fighting, roll a D3 to determine how many mission are fought this turn.


Phase 3a; Determine Mission Size
Roll a D3 to determine the size of the forces involved in the mission
1. Small skirmish 1000-1500
2. Medium sized battle 1500-2000
3. Large battle 2500+

If the Dark Eldar are attacking a strategic target modify the roll depending on the size of the target +1 for a large target, -1 for a small target.

Phase 3b; Pick Mission Forces
Once the mission force size has been determined both players can use units from their army rooster up to mission size. Player's army can be any value between the minimum and maximum points limits and they do not need to be declared until after the battle. If a Strategic target with a garrison is attack then garrison force must be included in the guard force. The rest of the force can be made up from other units on the army list.
Phase 4; Determine Missions
Once the mission force has been determined roll a D6 to determine mission. Fortunes of War mean the missions actual fought may not be the one intended also the type of mission depends on who is on the offensive.

Dark Eldar on the Offensive
1 Dawn Raid (Battle Missions book page 26)
2 Ambush (Dark Eldar attacking, main rulebook page 268)
3 Scorched Earth (Dark Eldar playing CSM, Battle Missions book page 26)
4 Slave Raid (Battle Missions book page 28)
5 Feigned Retreat (Battle Missions book page 30)
6 Ambush, (Imperial Guard attacking, see main rulebook page 268)

Imperial Guard on the Offensive
1 Ambush (Imperial Guard playing Necrons, Battle Missions book page 50)
2 Reconnaissance In Force (Imperial Guard playing Necrons, Battle Missions book page 52)
3 Implacable Advance (Imperial Guard playing Necrons, Battle Missions book page 54)
4 Cut and Run (Imperial Guard playing Orks, Battle Missions book page 62)
5 Ambush, (Dark Eldar attacking, see main rulebook page 268)
6 Combat Patrol* followed by Pre-emptive Strike (Imperial guard playing Eldar, Battle Missions book page 34)

Lull in the Fighting
1 All Round Defense (Imperial Guard playing Marines, Battle Missions book page 70)
2 Vertical Envelopment (Dark Eldar playing Tau, Battle Missions book page 74)
3 Fighting Withdraw (Dark Eldar playing Tau, Battle missions’ book page 78)
4-5 Cities of Death (randomly select a Cities of Death mission)
6 Combat Patrol*


* Combat patrols are kill teams mission (battle missions books page 90). The combat patrol must be selected from the force intend for the battle. The rest of the force in unavailable to fight in any battles this turn. If the Imperial guard win then they find out the location of the Dark Eldar base and can target it for destruction.

Phase 4; Play Mission
-break point
before playing the mission players need to work out the break point of their force. This determines how much damage the force can take before it considers withdrawing.
*each any type infantry model is worth one point
*monstrous creatures are worth their number of wounds
*each vehicle with a total armor (front +side + rear) less or equal to thirty three is worth five points
*each vehicle with a total armor (front + side + rear) between thirty four and forty is worth ten points.
*each vehicle with a total armor (front + side + rear) more than forty is worth twenty points

Any model killed gives up its break point. Damaged vehicles give up half of theirs.

Run away;
Once a force has lost a third of its break points it can voluntarily opted to withdraw. Once a force has lost two thirds its break points at the start of its turn, it must pass a leadership test, based on the highest leadership model the force has left on the table. Alternatively, units can voluntarily move off the table edge models that do so may not return later.

Phase 5; Determine Results
Victory or Death
Lost the mission criteria +5
Drawn the mission criteria +10
Won the mission criteria +15
Game VPs difference 10%+ +1/-1
20%+ +2/-2
30%+ +3/-3
40%+ +4/-4
50%+ +5/-5
eg for 2000 point game 10% would be 200 points so if the winner had 200 points more of his army alive than the loser at the end of the game then the score would be modified +1 to the winner, -1 from the loser.

Once both players have determine their score. Use the difference in scores to determine results,
0-3 Draw
4-8 minor win
9-14 major win
15+ massacre

Determining causalities
Not all models lost are necessarily killed, some may be lightly wound or temporarily put out of play. Roll a D6 to see if a model is returned to duty

casualty test (returned to duty on a...)
3+ for troops
4+ for others (HQ, heavy, etc)

modifiers
+1 for winning
-1 for losing


Veterans;
units that survive the mission can gain veteran status as outlined in the main rulebook page 263.


-Gaining and spending campaign points
Massacre winners gets three campaign points
Major win winner gets two campaign points
Minor win winner gets one campaign point
Draw or loss both players get one campaign point.

Campaign points can be spend on the following,
1 campaign point to upgrade a unit to veterans
1 campaign point +/- to the next mission roll (declare secretly to the umpire beforehand)
1 campaign point to add D6 VPs points to a players score.

-Destroying strategic targets
If the Dark Eldar attack and win a battle against the strategic target then the target is destroyed and it VP value is subtract from the guard total and transferred to the Dark Eldar.


7 Finale
The game last for six number of turns after which whoever has the greatest number of victory points is the winner.

Alternative if players want any surviving units can be used in a apocalypse game.